A few years ago I purchased some outdoor string lighting from Hobby Lobby. It was perfect for my deck(s) because it was white and the decks are painted white. I spent several hours one afternoon, running it around the top of the pergola to the right of the screened-in porch and under the arm rail of the deck to the left of the porch.

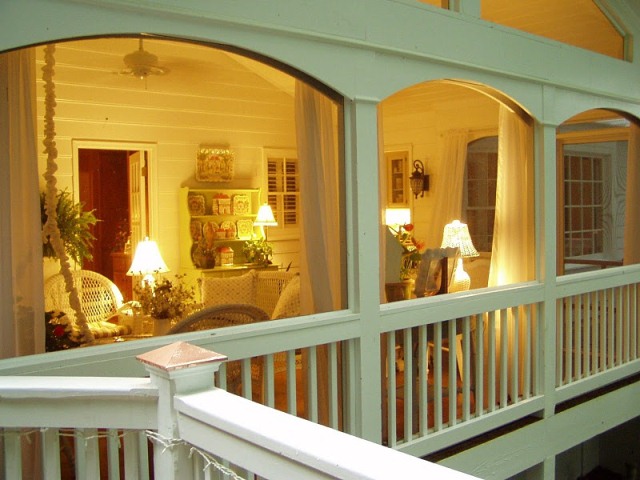
Within the year, something chewed through the wiring in several places on both decks. Eventually I removed the wiring from under the handrail on the deck on the left. You can just see it in this pic (below) taken before it was removed. It was so pretty lit up...made me sad to remove it. But the critter damage was in a place that couldn't easily be repaired.
A friend repaired the damaged area of the lighting on the pergola side.

It was chewed through toward the lower section--the part that runs a few feet away from the bird feeder on that side.

We suspected the damage had been caused by a raccoon because there had been other signs indicating one was visiting the feeder each night.

Within months of the repair, It (whatever It is) did it again. Grrrr! Not amused. You can see the chopped off wiring at the bottom of this pic below.

I guess it's partly my fault because I have feeders hanging off the decks and that tends to draw "wildlife" to your home.

But if I place the feeders down in the yard, I can't see them at all unless I walk over to the edge of the porch and stand there looking down. Plus, the feeders would be so far away from the porch, I would barely even be able to see the birds when they came to eat. I love sitting on the porch and watching them swoop down from the trees to feed just a few feet away.

I tried bringing the feeders in at night, but I often forgot until it was pitch black dark outside. And no way this girl was plucking feeders off the deck in the dark. Here in the south, GIANT cockroaches come out at night--the kind you can saddle up and ride. I was not taking a chance on a close encounter with one of those...not even to save my outdoor wiring!
I finally solved the "forgetting" problem by setting the alarm on my cell phone to go off each night around dusk. Once I began remembering to bring in the feeders each evening, whatever was coming to dine, stopped coming.
This past week, I went down into the backyard and retrieved the section of wiring that had been chewed off this last time. You can see it lying there on the deck floor. I got out my step ladder and started to take all the wiring down, but then I stopped. I decided to give it one more try since I'm bringing the feeders in now.

(Please note: This post is not a tutorial for lighting repair. Please do not try this at home based on my post. It's best to always seek a professional electrician when you are in need of electrical work or for a repair.)
I got out my needle nose wire cutters and snipped into the wire near the end where it had been chewed through.

I barely cut into it, being careful to not cut all the way through to the copper wires inside.

I striped off the protective covering exposing about an inch of the copper wiring. See that chewed up arm in the background. It also munched on my brown outdoor wicker. :(

I did this to all four damaged wires. They had all been completely chewed through.

Then I twisted each pair of wires together to reestablish the connection.

I covered the ends with some little yellow wire caps I had saved from a previous lighting purchase/installation.

And since this wiring is outdoors, I also wrapped the ends with white electrical tape to hopefully help protect it during rain storms.

I ran the wiring down the back side of one of the pillars supporting the pergola, all the while praying the wiring was still going to be long enough to reach the outlet on the deck. I couldn't remember exactly how long it had been before.

It just barely reached, but it did reach. Would my repair work?

Yes! Yipee!

Repaired, once again.

A nighttime view at 10:00 PM Saturday evening.

I lit the candles on the candlelier, too--just for you!. :)
Unfortunately, one globe is missing...you can read about that raccoon disaster in THIS post. If you know where I can find another one just like these 5, please let me know. The candelier was from Smith and Hawken and it sold out almost as soon as they got it in. I just barely got one before they were all gone. Then a year or two later, S & H went out of business. I tried to buy more globes when they were selling the candleliers, in case I dropped one, one day--but they were out of them and never got them back in.

I'm not sure why this pic below came out so nice and bright. The lighting isn't this bright in person, but it isn't as dark on the deck as the pics above, either. The string lighting really adds a lot to this deck. I love turning it on in the evening and enjoying it from inside on the porch. When guests are visiting, it's especially nice to have the deck(s) lit up. Lighting creates such a special atmosphere, be it inside or out.

This picture below is the most accurate of how the porch looks at night with the pergola lit up. It's really pretty with candles on the table underneath the candlelier.

Keeping my fingers crossed nothing comes dining on my lighting again. Do you have exterior lighting on your deck? Had any problems with raccoons or critters chewing on it?
To see more of the screened-in porch and deck construction, click HERE and HERE and HERE.
To read about 9 awesome features you may want to consider including when building a screened-in porch, click HERE.
You'll find additional details about the porch construction (flooring, size, sheers etc...) under the FAQ category at the top of this blog.
Again, let me say, this post is not a tutorial for lighting repair. I'm not an electrician. I recommend you always call a licensed electrician when you have a lighting repair or issue in your home.
Looking forward to your Before and After!
To receive the latest posts, as well as updates about blog parties, subscribe via an RSS Reader or have BNOTP delivered right to your Inbox. You'll find links to subscribe via RSS and Email on the sidebar to the right. Thanks for reading; so glad you are here!
Reading this post via e-mail or RSS feed?
*If you are reading this via email or RSS feed, to view all the tablescapes linked for Tablescape Thursday, click HERE.

Metamorphosis Monday:
If you are participating in Metamorphosis Monday you will need to link up the permalink to your MM post and not your general blog address. To get your permalink, click on your post name, then just copy and paste the address that shows up in the address bar at the top of your blog, into the "url" box for InLinkz.
If you'd like to include the MM button in your post, just copy and paste the Met Monday button to your computer or grab the html code from underneath the MM logo under the "BNOTP Parties" header at the top of this blog.
In order to link up, you'll need to include a link in your MM post back to the host blog, Between Naps on the Porch so your regular readers will be able to find the Met Monday party which ensures your friends and fellow bloggers will receive lots of visits, too.
PLEASE DO NOT type in all caps...it spreads the links waaaay out. Thanks!
Let's try something fun today! Please visit the person who linked before you and after you...that way everyone will get some visits. Hope you'll visit more, of course.
Welcome! Thanks for coming to the party!

Within the year, something chewed through the wiring in several places on both decks. Eventually I removed the wiring from under the handrail on the deck on the left. You can just see it in this pic (below) taken before it was removed. It was so pretty lit up...made me sad to remove it. But the critter damage was in a place that couldn't easily be repaired.

A friend repaired the damaged area of the lighting on the pergola side.

It was chewed through toward the lower section--the part that runs a few feet away from the bird feeder on that side.

We suspected the damage had been caused by a raccoon because there had been other signs indicating one was visiting the feeder each night.

Picture from Wikipedia
Within months of the repair, It (whatever It is) did it again. Grrrr! Not amused. You can see the chopped off wiring at the bottom of this pic below.

I guess it's partly my fault because I have feeders hanging off the decks and that tends to draw "wildlife" to your home.

But if I place the feeders down in the yard, I can't see them at all unless I walk over to the edge of the porch and stand there looking down. Plus, the feeders would be so far away from the porch, I would barely even be able to see the birds when they came to eat. I love sitting on the porch and watching them swoop down from the trees to feed just a few feet away.

I tried bringing the feeders in at night, but I often forgot until it was pitch black dark outside. And no way this girl was plucking feeders off the deck in the dark. Here in the south, GIANT cockroaches come out at night--the kind you can saddle up and ride. I was not taking a chance on a close encounter with one of those...not even to save my outdoor wiring!
I finally solved the "forgetting" problem by setting the alarm on my cell phone to go off each night around dusk. Once I began remembering to bring in the feeders each evening, whatever was coming to dine, stopped coming.
This past week, I went down into the backyard and retrieved the section of wiring that had been chewed off this last time. You can see it lying there on the deck floor. I got out my step ladder and started to take all the wiring down, but then I stopped. I decided to give it one more try since I'm bringing the feeders in now.

(Please note: This post is not a tutorial for lighting repair. Please do not try this at home based on my post. It's best to always seek a professional electrician when you are in need of electrical work or for a repair.)
I got out my needle nose wire cutters and snipped into the wire near the end where it had been chewed through.

I barely cut into it, being careful to not cut all the way through to the copper wires inside.

I striped off the protective covering exposing about an inch of the copper wiring. See that chewed up arm in the background. It also munched on my brown outdoor wicker. :(

I did this to all four damaged wires. They had all been completely chewed through.

Then I twisted each pair of wires together to reestablish the connection.

I covered the ends with some little yellow wire caps I had saved from a previous lighting purchase/installation.

And since this wiring is outdoors, I also wrapped the ends with white electrical tape to hopefully help protect it during rain storms.

I ran the wiring down the back side of one of the pillars supporting the pergola, all the while praying the wiring was still going to be long enough to reach the outlet on the deck. I couldn't remember exactly how long it had been before.

It just barely reached, but it did reach. Would my repair work?

Yes! Yipee!

Repaired, once again.

A nighttime view at 10:00 PM Saturday evening.

I lit the candles on the candlelier, too--just for you!. :)
Unfortunately, one globe is missing...you can read about that raccoon disaster in THIS post. If you know where I can find another one just like these 5, please let me know. The candelier was from Smith and Hawken and it sold out almost as soon as they got it in. I just barely got one before they were all gone. Then a year or two later, S & H went out of business. I tried to buy more globes when they were selling the candleliers, in case I dropped one, one day--but they were out of them and never got them back in.

I'm not sure why this pic below came out so nice and bright. The lighting isn't this bright in person, but it isn't as dark on the deck as the pics above, either. The string lighting really adds a lot to this deck. I love turning it on in the evening and enjoying it from inside on the porch. When guests are visiting, it's especially nice to have the deck(s) lit up. Lighting creates such a special atmosphere, be it inside or out.

This picture below is the most accurate of how the porch looks at night with the pergola lit up. It's really pretty with candles on the table underneath the candlelier.

Keeping my fingers crossed nothing comes dining on my lighting again. Do you have exterior lighting on your deck? Had any problems with raccoons or critters chewing on it?
To see more of the screened-in porch and deck construction, click HERE and HERE and HERE.
To read about 9 awesome features you may want to consider including when building a screened-in porch, click HERE.
You'll find additional details about the porch construction (flooring, size, sheers etc...) under the FAQ category at the top of this blog.
Again, let me say, this post is not a tutorial for lighting repair. I'm not an electrician. I recommend you always call a licensed electrician when you have a lighting repair or issue in your home.
Looking forward to your Before and After!
To receive the latest posts, as well as updates about blog parties, subscribe via an RSS Reader or have BNOTP delivered right to your Inbox. You'll find links to subscribe via RSS and Email on the sidebar to the right. Thanks for reading; so glad you are here!
Reading this post via e-mail or RSS feed?
*If you are reading this via email or RSS feed, to view all the tablescapes linked for Tablescape Thursday, click HERE.

Metamorphosis Monday:
If you are participating in Metamorphosis Monday you will need to link up the permalink to your MM post and not your general blog address. To get your permalink, click on your post name, then just copy and paste the address that shows up in the address bar at the top of your blog, into the "url" box for InLinkz.
If you'd like to include the MM button in your post, just copy and paste the Met Monday button to your computer or grab the html code from underneath the MM logo under the "BNOTP Parties" header at the top of this blog.
In order to link up, you'll need to include a link in your MM post back to the host blog, Between Naps on the Porch so your regular readers will be able to find the Met Monday party which ensures your friends and fellow bloggers will receive lots of visits, too.
PLEASE DO NOT type in all caps...it spreads the links waaaay out. Thanks!
Let's try something fun today! Please visit the person who linked before you and after you...that way everyone will get some visits. Hope you'll visit more, of course.
Welcome! Thanks for coming to the party!


