Happy Met Monday! How was your weekend? I've had a busy one. Saturday, I drove down to Macon, Georgia and attended a class for "extreme couponing" with my sister and niece. I watch so little TV, I didn't even know what extreme couponing was. It was really interesting. If you have a good size family, I can see how the savings could really add up. I'll share some of what I learned in a post sometime soon. I had no idea using coupons had become such a big thing...practically a sport!
So, there I was the other night, lying in bed and trying to envision a way I could decorate a pumpkin without cutting into it or painting it, when suddenly I had an idea.
Ribbon!
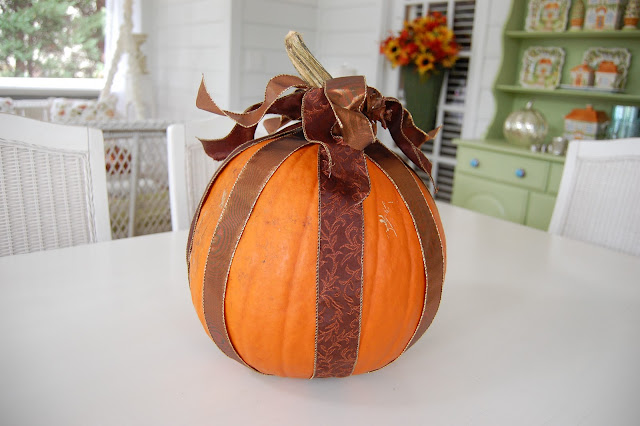
Here's a pic of my finished pumpkin out on the porch where the lighting is a bit better. This may be the easiest pumpkin decorating idea in the history of the world of pumpkin decorating. Seriously! If you like easy, you're gonna love this.
I used the pumpkin I already had...the one that's visible in the background in THIS post from Tablescape Thursday.
Supplies you'll need:
Medium size pumpkin with a stem
2 colors of wired ribbon (my ribbon was 1 1/2 inches wide)
1 napkin ring
I bought two types of ribbon (on sale 40% off) from Hobby Lobby. I chose one with a leaf pattern and one with a metallic/shiny finish. You won't need a lot of ribbon for this project...just depends on the size of your pumpkin. You'll want to cut 4 or 5 strips of each color ribbon. For my medium size pumpkin, I cut four, 50" strips of ribbon, from each color. So I cut 8 strips total and each was around 50" long.
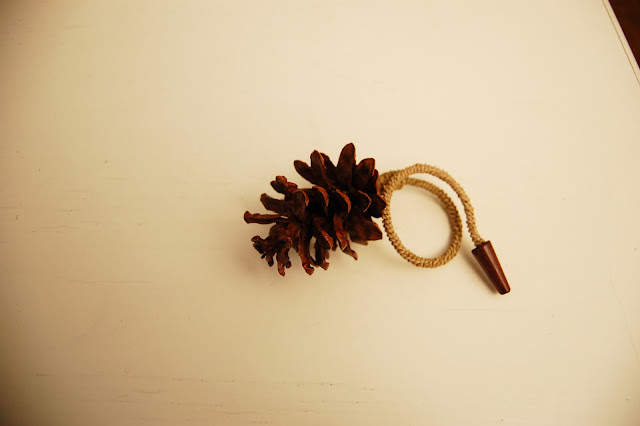
The other thing you'll need is a napkin ring. I decided to use one of these pine cone napkin rings I've used previously in a Thanksgiving table setting HERE and HERE. They had a nice fall feel.
Just slide your napkin ring down over the stem of your pumpkin. Next, place your pumpkin on top of one of the strips of ribbon you've cut, centering the pumpkin on top of the ribbon. Pull one end of ribbon upward and tuck it up under the napkin ring, pulling it out the top of the ring, as shown. Do the same thing for the other end of that strip of ribbon, pulling it up on the opposite side of your pumpkin.
Continue doing this with all the ribbon you've cut for your pumpkin, spacing the strips of ribbon out whatever distance you prefer.
Closer view:
As you pull your wired ribbon up and under the napkin ring, you can bend the ribbon downward as shown below to just help hold the ribbon in place.
It will look like this when you have all your strips of ribbon pulled up and through the napkin ring.
Turn the ribbon strips downward, bending your wired ribbon at whatever angle(s) you like best. I also cut the ends/tips of my ribbon strips at an angle because I just like that look better. You can just see the pine cone peeking out from the ribbon.
Here's a view of the other side of my pumpkin...
Ribbon really dresses a pumpkin up. The ribbon I chose actually added a touch of elegance to my pumpkin. I wasn't really expecting that, so that was a nice surprise.
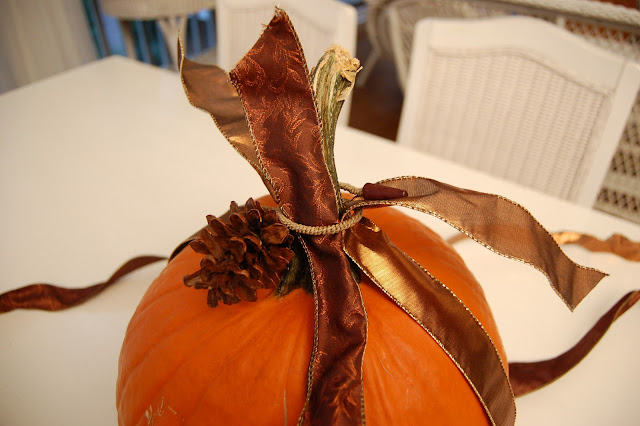
A close up of the top of the finished pumpkin. I tucked the ribbon down under the pine cone so it would be a bit more visible. This would be cute with any fall-ish napkin ring.
A ribbon bedecked pumpkin would make a nice centerpiece for a Halloween party or buffet table.
Click for more Halloween decorating ideas. (Scroll down to the Halloween section.)
Related links in this post:
Thanksgiving Table Setting with Pine Cone Napkin Ring
2nd Thanksgiving Table Setting with Pine Cone Napkin Ring
Looking forward to all the Before and Afters for this Met Monday!
To receive the latest posts, as well as updates about blog parties, subscribe via an RSS Reader or have BNOTP delivered right to your Inbox. You'll find links to subscribe via RSS and Email on the sidebar to the right. Thanks for reading; so glad you are here!
Reading this post via e-mail or RSS feed?
*If you are reading this via email or RSS feed, to view all the tablescapes linked for Tablescape Thursday, click HERE.

Metamorphosis Monday:
If you are participating in Metamorphosis Monday you will need to link up the permalink to your MM post and not your general blog address. To get your permalink, click on your post name, then just copy and paste the address that shows up in the address bar at the top of your blog, into the "url" box for InLinkz.
If you'd like to include the MM button in your post, just copy and paste the Met Monday button to your computer or grab the html code from underneath the MM logo under the "Join a Blog Party" header at the top of this blog.
In order to link up, you'll need to include a link in your MM post back to the host blog, Between Naps on the Porch so your regular readers will be able to find the Met Monday party which ensures your friends and fellow bloggers will receive lots of visits, too.
PLEASE DO NOT type in all caps...it spreads the links waaaay out. Thanks!
Let's try something fun today! Please visit the person who linked before you and after you...that way everyone will get some visits. Hope you'll visit more, of course.
Welcome! Thanks for coming to the party!
So, there I was the other night, lying in bed and trying to envision a way I could decorate a pumpkin without cutting into it or painting it, when suddenly I had an idea.
Ribbon!
Here's a pic of my finished pumpkin out on the porch where the lighting is a bit better. This may be the easiest pumpkin decorating idea in the history of the world of pumpkin decorating. Seriously! If you like easy, you're gonna love this.
I used the pumpkin I already had...the one that's visible in the background in THIS post from Tablescape Thursday.
Supplies you'll need:
Medium size pumpkin with a stem
2 colors of wired ribbon (my ribbon was 1 1/2 inches wide)
1 napkin ring
I bought two types of ribbon (on sale 40% off) from Hobby Lobby. I chose one with a leaf pattern and one with a metallic/shiny finish. You won't need a lot of ribbon for this project...just depends on the size of your pumpkin. You'll want to cut 4 or 5 strips of each color ribbon. For my medium size pumpkin, I cut four, 50" strips of ribbon, from each color. So I cut 8 strips total and each was around 50" long.
The other thing you'll need is a napkin ring. I decided to use one of these pine cone napkin rings I've used previously in a Thanksgiving table setting HERE and HERE. They had a nice fall feel.
Just slide your napkin ring down over the stem of your pumpkin. Next, place your pumpkin on top of one of the strips of ribbon you've cut, centering the pumpkin on top of the ribbon. Pull one end of ribbon upward and tuck it up under the napkin ring, pulling it out the top of the ring, as shown. Do the same thing for the other end of that strip of ribbon, pulling it up on the opposite side of your pumpkin.
Continue doing this with all the ribbon you've cut for your pumpkin, spacing the strips of ribbon out whatever distance you prefer.
Closer view:
As you pull your wired ribbon up and under the napkin ring, you can bend the ribbon downward as shown below to just help hold the ribbon in place.
It will look like this when you have all your strips of ribbon pulled up and through the napkin ring.
Turn the ribbon strips downward, bending your wired ribbon at whatever angle(s) you like best. I also cut the ends/tips of my ribbon strips at an angle because I just like that look better. You can just see the pine cone peeking out from the ribbon.
Here's a view of the other side of my pumpkin...
Ribbon really dresses a pumpkin up. The ribbon I chose actually added a touch of elegance to my pumpkin. I wasn't really expecting that, so that was a nice surprise.
A close up of the top of the finished pumpkin. I tucked the ribbon down under the pine cone so it would be a bit more visible. This would be cute with any fall-ish napkin ring.
A ribbon bedecked pumpkin would make a nice centerpiece for a Halloween party or buffet table.
Click for more Halloween decorating ideas. (Scroll down to the Halloween section.)
Related links in this post:
Thanksgiving Table Setting with Pine Cone Napkin Ring
2nd Thanksgiving Table Setting with Pine Cone Napkin Ring
Looking forward to all the Before and Afters for this Met Monday!
To receive the latest posts, as well as updates about blog parties, subscribe via an RSS Reader or have BNOTP delivered right to your Inbox. You'll find links to subscribe via RSS and Email on the sidebar to the right. Thanks for reading; so glad you are here!
Reading this post via e-mail or RSS feed?
*If you are reading this via email or RSS feed, to view all the tablescapes linked for Tablescape Thursday, click HERE.

Metamorphosis Monday:
If you are participating in Metamorphosis Monday you will need to link up the permalink to your MM post and not your general blog address. To get your permalink, click on your post name, then just copy and paste the address that shows up in the address bar at the top of your blog, into the "url" box for InLinkz.
If you'd like to include the MM button in your post, just copy and paste the Met Monday button to your computer or grab the html code from underneath the MM logo under the "Join a Blog Party" header at the top of this blog.
In order to link up, you'll need to include a link in your MM post back to the host blog, Between Naps on the Porch so your regular readers will be able to find the Met Monday party which ensures your friends and fellow bloggers will receive lots of visits, too.
PLEASE DO NOT type in all caps...it spreads the links waaaay out. Thanks!
Let's try something fun today! Please visit the person who linked before you and after you...that way everyone will get some visits. Hope you'll visit more, of course.
Welcome! Thanks for coming to the party!


