A Thanksgiving Table Setting, One Week Late: Welcome to the 171th Tablescape Thursday!

    I'm a week late but for this Tablescape Thursday I'm sharing the Thanksgiving table setting I had been working on when my camera cat-astrophe occurred. All the pics in this post were taken with the new camera, a Nikon D5100. This camera is super, duper light sensitive, which is why it works so well in low lighting situations. It will take me a little while to get used to the change, so please bear with me while I "learn" the camera.

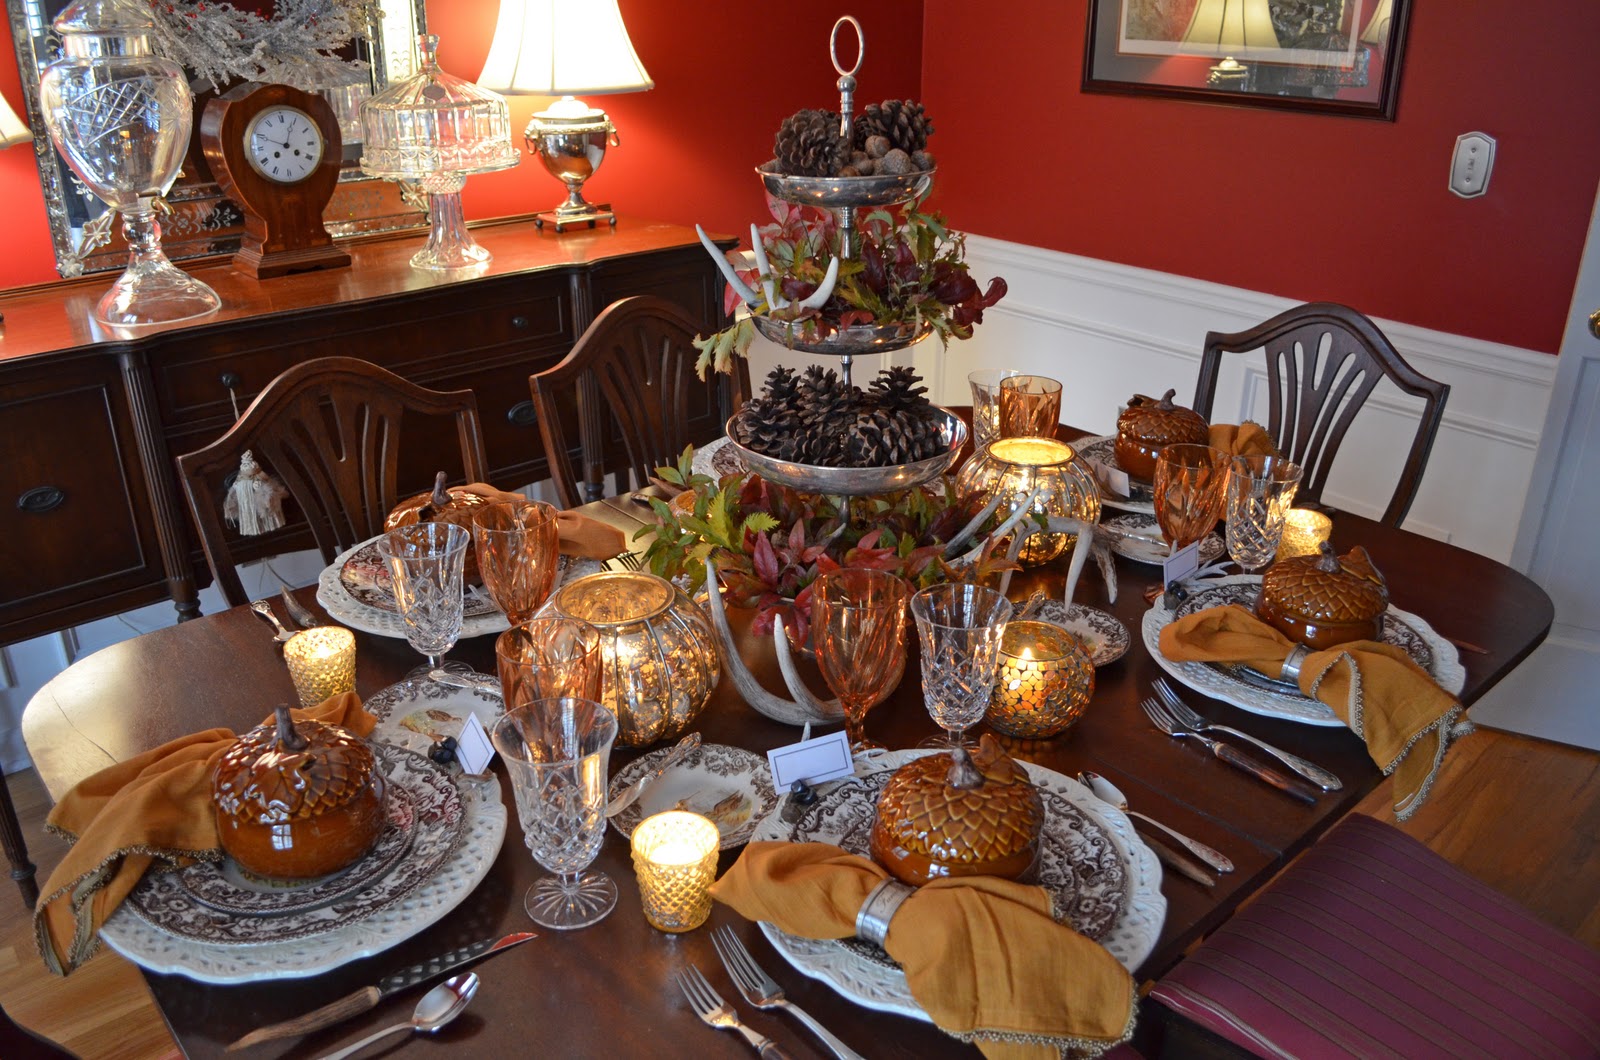
    For this Thanksgiving tablescape I envisioned a soft, sophisticated mix of shiny silvers and browns, with touches of amber.  I usually like bold pops of color in my tablescapes, but I went for a more subtle feel this year.


    I never like using the leaf in the table, so this table setting is a little on the cozy side.  You like cozy, right?


    Spode Woodland is my favorite pattern for Thanksgiving.


    I forgot to take pics of the china without the acorn soup tureen on top, so I borrowed the next two pics from a previous Thanksgiving 'scape.  I added the turkey salad plates to this Woodland collection last year.  Or, was it the year before--I forget now.


    Here's the dinner plate.  Another favorite of mine for Thanksgiving is the antler flatware I found on eBay a few years ago.  Since the set only included a fork and knife, I like to mix in the Spode Woodland flatware.


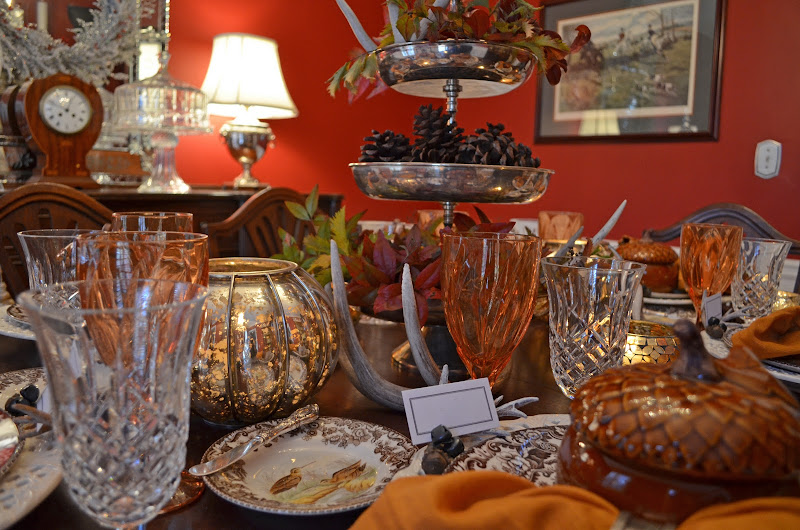
    You may recognize the soup tureens.  I've used them previously in this Thanksgiving tablescape.  (Click link to view.)  For that tablescape, I mixed two different colored tureens: gold and brown.  For this table setting I chose to keep it simple, using only the brown.  The napkin rings are new this year, a find from Pottery Barn.  They worked great with this silver/brown/amber color scheme  They are etched with the words, Friends and Family--a perfect sentiment for a Thanksgiving feast.


    The beautiful amber-colored stemware is "Breeze Amber" by Noritake.  You may remember it from THIS fall tablescape. Iced tea glass is Waterford, pattern is Araglin.


    Spotted these cute antler ornaments at Walmart this year.  I removed the little gold hanging loop.


    They made great place card holders for this woodsy table setting.  They also tied in beautifully with my centerpiece--more on that in a sec.  Each ornament was only  $1.97 and included two antlers, so all six place card holders were around $6.  When  you're out ornament shopping, keep your eye out for treasures you can use as place card holders or napkin rings.  It's an inexpensive way to add some creativity and playfulness to your table settings.


    Do you recognize the large, mercury-glass, pumpkin candle holders?   They were last used in this Halloween table setting.  They continued the silver theme of this tablescape.  I placed them on either side of a 4-tiered, silverplate server and filled the server with natural elements: pine cones, acorns, nandina, spirea and antlers.


    Last year I tried several times to win "shed" antlers on eBay, but alas, someone always managed to outbid me. This year when I saw Pottery Barn was asking $29 for just one faux antler, I decided to try again.  I just couldn't pay that for a fake antler.

    As I shopped on eBay, I focused on the auctions for the "shed" antlers.  I really like the idea of using the naturally shed antlers for decorating. If you would like to read more about shed antlers, you can do that HERE.  I ended up winning 4 big, beautiful antlers for $61, the cost of 2 faux antlers at Pottery Barn.


    You can see the beautiful coloring on these antlers.  They were still nice and fresh--you can tell because they still have a lot of the brownish coloring, as well as obvious wax rings.  The seller found these in the northwest corner of Minnesota.  I love knowing that.  Does that make me weird. lol   The antler centerpiece ties in with the antler flatware and antler place card holders.  See, there's method to my madness. ;)

    If you look on ebay, search for "shed antlers.  Read the descriptions if you want to make sure they are truly shed antlers.  No need to buy faux when you can get the real, naturally shed antlers for a lot less.  I used two in the tiered server centerpiece and two on the table itself.  Something tells me they just may end up on a mantel or in a Christmas wreath this year.


    I cut Fire Power nandina from the yard and mixed in some colorful spirea foliage for a tiered centerpiece.  The centerpiece is all natural and includes pine cones and acorns.  These are the acorns I blogged about HERE.  And for the record, no worms, yet.  I'll keep you posted on that.  I'm trying to avoid the "baking-in-the-oven" thing. lol  Check out the post and the comments for more details.


    The silverplated tiered server could have used a bit of polishing but I thought the slightly tarnished look worked well with the woodsy theme of this table setting.  That's better than saying I was too lazy to polish it.


    I've used this tiered server in a previous Christmas table setting, HERE.  It was nice and shiny for that tablescape.


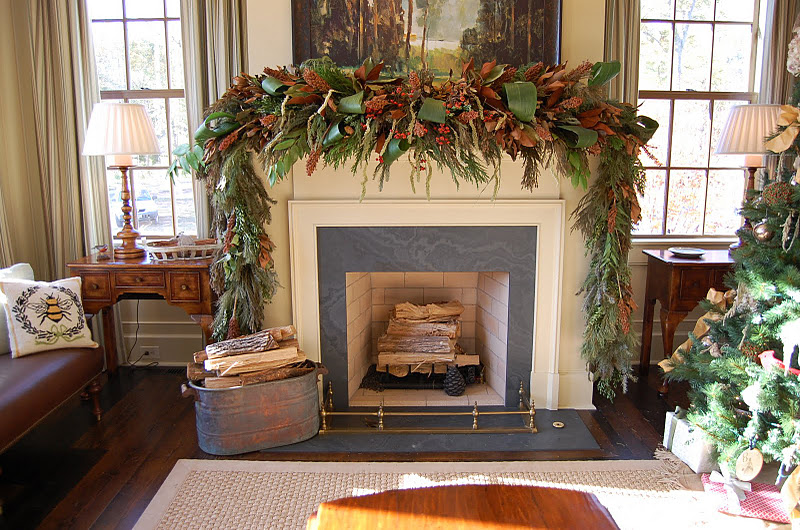
    Hope you enjoyed this Thanksgiving table setting.  Pssst:  Molding was added to this room a while back.  To see the "Before and After" click HERE.


    Looking forward to all the beautiful tablescapes posted for this Tablescape Thursday!


    To receive the latest posts, as well as updates about blog parties, subscribe via an RSS Reader or have BNOTP delivered right to your Inbox.  You'll find links to subscribe via RSS and Email on the sidebar to the right.  Thanks for reading; so glad you are here!

    Reading this post via e-mail or RSS feed?
    *If you are reading this via email or RSS feed, to view all the tablescapes linked for Tablescape Thursday, click HERE.

    Please Read:
    If you are participating in Tablescape Thursday, please be sure to add your permalink below, and not your general blog address. To get your permalink, click on your post name, then just copy and paste the address that shows up in the address bar, into the "url" box when you link up.

    If you would like to use the Tablescape Thursday logo button in your post, just copy and paste it to your computer and upload it to your post as you would any photo. Or, grab the html code you'll find under the "BNOTP Parties" heading at the top of this blog.

    Please link back to the party so your regular readers will find all your fellow Blogger's tablescapes, too.

    Please, don't add your post name/blog name ALL IN CAPS...it tends to create big spaces between the rows of links. Thanks!

    Let's try something fun today! Please visit the person who linked before you and after you...that way everyone will get some visits. Hope you'll visit more, of course.


    Welcome! Thanks for coming to the party!

Teen Lounge Gallery Wall

    I know I should be working on Christmas projects but I am in full swing with this Teen Lounge.  The room is surprising coming together quickly (at least by my standards).  And I have to admit, it’s a pretty cool space to hang out in.   I just finished up a few large painting projects and hope to get on to my Christmas decorations later today.

    clip-art

    A few weeks back I posted a gallery wall collage of some ideas that I came up with in Photoshop.  I invited you to “LIKE” your favorite and leave a comment.  Thank you to everyone that voted and shared your ideas!  I really appreciate you taking the time out of your day.

    I was thrilled that #6 was the most “LIKE”ed option!  Why?  because it was my favorite too!!  That really shows me that the readers of Dittle Dattle get me!  ha ha     I guess us like-minded people gravitate to one another.

    .

    .

    .

    Teen-Lounge-DIY-Wall-Frames

    But Wait!!!!

    So why did I choose #4?

    Well, I have a couple of reasons. 

    • First my teenage son thought the room was getting too “busy” looking.
    • Secondly, I have a little something up my sleeve for the adjacent wall and if he thinks it busy now he might be completely overwhelmed if I over do the gallery wall.
    • Thirdly, my kids liked #4 the best and ultimately it is their room. 


    Custom-Frames--Dittle-Dattle


    Teen-Lounge-DIY-Frames--Dittle-Dattle-blogspot

    I purchased a whole group of frames at Ikea.  you know the ones?? basic black with white mats.  As I was laying them out on the floor it just seemed boooooorrrrrring!  With the oversized clock in black,  those black frames weren’t working for me. 

    Well, I remembered seeing some really awesome frames in a boutique during our summer vacation in Upstate NY, and then I also remember I bought a quart of ASCP (Annie Sloan Chalk Paint)  in Providence that I hadn’t even popped the lid to yet.  So before I knew it, I had a project in the making.

    DIY-Photo-Frames--Dittle-Dattle

    Just using scrap wood, glass, and paint, I have four amazing frames for FREE!  yeah!

    Custom-DIY-frames--Dittle-Dattle  

    The glass and photographs are held by simple square nuts and screws.  Look closely…… my glass cutting is not square!  LOL  That just adds to the charm!

    The ASCP Providence was a bit bright for me at first so on the second coat I mixed in a little ASCP Old White.  With the sanding and distressing it really gives the frame another dimension. 

    Teen-Lounge-Custom-Frames

    Don’t you just love them?

    Would you like a tutorial?

    Honestly they were easy to make and I’m sure I will be making more.

    Teen-Lounge-gallery-wall--Dittle-Dattle

    I still may do idea #6 but I’m waiting to see how the other wall comes out first. 

    Teen Lounge Updates

    And one last update I wanted to show you… the new rug.  I showed you an Ikea one that I purchased a month ago that was made of natural fibers, but that had to be returned!  You could not walk across it with out it feeling like thousands of needles were poking your feet! ouch!!  I have seen the same rug all over the internet and NO ONE mentioned how uncomfortable it was.  That’s not me.  That’s not this blog.  I will always give you my honest opinion.  And I always have an opinion!!! he he

    While browsing around Ikea, again, I spotted this colorful one, and with my mother’s confidence, I brought it home and was completely delighted!  The kids like too, which is also a bonus.  The coffee table is something that the Hubs and I had in one of our first apartments.  It was actually sitting at the backdoor waiting to go to Goodwill when I thought….. “what if….. I sprayed it black?”  It’s not the look I’m going for but it will do for now.Carrie

Hang Wreaths on Your Exterior Windows: A Tutorial

    Though I didn't have a working camera this week, I did manage to get all the "outside" wreaths hung and snapped a few pics for this tutorial.  The porch isn't decorated, yet.  This is an old pic from a past Christmas showing the wreaths across the front of the house.


    Wreaths hung on windows across the front of a home has to be my most favorite Christmas decoration of all.  I've been hanging them on my home now for around 28 years, first at our old house and for the last 21 years on this home.  Each year when I hang them, I think back to the first time I saw them on the front of a house.  I marveled at the tremendous effort it must have taken to hang all those wreaths, envisioning long hours on a very, very tall ladder.  Then one day the proverbial light bulb went off and it hit me just how easy it would be to hang them.


    You may already be hanging wreaths on your windows, but if not, this post is a little tutorial showing how I hang mine each year.  I have 13 windows on the front of my home.  When you first decide to hang wreaths, there's a bit of an initial investment.  After that, they last almost forever.  I did purchase new wreaths about 10 years ago but that was just because the first ones I bought were pretty skimpy.  Wreaths have come a long ways over the year--much more realistic looking now.

    Measure your windows before purchasing your wreaths.  You don't want them to be too small or too big.  Apply the Goldilocks factor here.  For comparison, my windows are 32 inches wide and my wreaths are around 21-22 inches wide.

    There are several ways to hang them.  You could buy those suction cup thingies that stick to windows.  I prefer hanging them from ribbons--just love the look of a wreath hanging from a pretty ribbon.  If you do wish to hang them with ribbon, be sure to buy outdoor ribbon.  You'll need about 4-5 feet for each wreath depending on the size/height of your windows.

    I prefer to use 2 1/2 inch wide ribbon for my hanging ribbons.  The ribbon I originally used to hang my wreaths was narrow.  (See first pic of the house above to see the narrow hanging ribbon.)  When that ribbon eventually began to shred after many years of use, I bought the wider ribbon and I much prefer that look.  (See picture just above for wide ribbon look.)

    After you've purchased your wreaths and your ribbon, you'll need to cut the ribbon and wrap it around the top of your wreath.  Previously I stapled the ribbon together after wrapping it around the top of the wreath.  That lasted for many years but eventually the staples began to cause the ribbon to shred.  That's when I changed the hanging ribbons out to the wider 2 1/2 inch ribbon.  I hot glued it together after wrapping it around the top of the wreath and it has held.  (see pic below)  Be careful if you use hot glue; you can feel it through the ribbon and it's HOT!


    I purchased ready-made bows at Michael's for half-price after Christmas one year.  I chose bows with long flowing tails.  They look so pretty swirling in the breezes all during the month of December.  Again, there's a little investment in the beginning for your bows, but they last for many, many years.  These bows are around 8 years old now and they still look new.  You can place your bows at the top of your wreath or at the bottom--whatever look you prefer.  I'm a "bow at the bottom" girl.


    Once you have all the hanging ribbons attached to your wreaths and all the bows are wired on, it's time to hang them.  Now, go get your 28 foot extension ladder and call your insurance company for a little extra life insurance.  Kidding!  If you have double sash windows (hope you do because that's what this tutorial covers) lower the top sash about a foot and push your be-ribboned wreath out the top.  Hold fast to the end of the hanging ribbon or you'll get some extra exercise running down to the yard to fetch it back.  I speak from experience.


    I have wood windows so I just stick a push pin through the ribbon into the top of the window.  I try to hit the same hole each year.


    Normally I let the tail of the ribbon drape down, but this year I decided to pull out my ancient candles and use them in the windows along with the wreaths.  So I pinned the tail of the hanging ribbon up with the push pin.

    I haven't put the candles in the windows for many years.  In the past I tried battery operated candles but they were not nearly as bright as the electric ones.  So I donated those and stuck with the electric.  I just set the candle over the window lock and then run the cord through the side gap where the shutters close.  There's just enough space for it to fit.  I usually tape the cord in place on the window with a small piece of masking tape.  You could also place the candle on the window sill, if you prefer.  My shutters won't close with it there, but that would work for curtained windows.  Just make sure the bulb isn't touching the fabric or anything else that could burn or catch fire.

    Oh, this year I noticed the flickering bulbs in Walmart.  They were around .97 cents each.  I bought some but after trying just one, I think I'm going to return them.  They are really pretty, but not very bright.  I may give them another try.  They really were pretty flickering red and orange in the window.


    See what's outside this dormer window?  It's the top of the camellia I shared a couple of days ago HERE.  The cold hasn't killed the blooms, yet.  Unfortunately, it's just a matter of time.  Hopefully it will bloom again in late winter when it's really supposed to be blooming.  Georgia weather is so crazy.  Two days ago it was 70 degrees--now it's freezing out.  No wonder the plants are so confused.


    Now, I want to show you something new I did this year since I'm using the electric candles in the windows again for the first time in many years.  It's a big improvement over what I've done in the past and was prompted by having a secretary in front of the outlet I would normally use.  I didn't want to unload everything out of the secretary to move it, so I decided to use the outlets you see on either side of the room.  (Note the arrows.)  It was still a bit of a pain getting behind the trunk on the left and the table on the right to plug in the extension cords.  They would be easier to move or reach behind than the hutch, but still a pain.


    So I headed over to Big Lots (Walmart has these, too) and purchased several of these extension cords with the foot operated, on/off switch.   I bet you use these for your Christmas tree.  They are the best things!  You just step on it to turn your lights on or off---no fumbling behind furniture or trees to get to the outlet to unplug the lights on the tree, or in this case, the windows.  I definitely recommend this for window lights if you can hide it behind a table skirt or something near by.  I put one downstairs in the living room and I can turn the candles in both windows on and off with just one step.  This is going to make turning the candles on and off a cinch this year.  Another great option would be timers for your candles.  I saw bunches of those at Walmart, as well.  I may try those next year.


    A final daylight view, taken with the new, correctly-focusing, camera.   See what I mean about the long ribbon streamers hanging below...love that look!  I hung the wreaths a tad higher than normal on the top windows so the candle would be right in the center of the wreath.  Normally they would be down just a bit lower and the tails of the bow would be almost touching the window sill.  I still haven't hung the wreaths or put the lights in the garage windows behind the magnolia and camellia.  The garage windows are filled with dead buggies and I just didn't feel like dealing with that yesterday.  Yuck.  What is it about garage windows?  They are bug magnets!


    A previous year's view of the dormer windows with the garage windows below.  This pic was taken with the skinnier hanging ribbons, before I changed them out for the 2 1/2 inch wide ribbon.  The wider ribbon just looks so much better than the skimpy narrow ribbon for hanging.  I see camellias about to flower out in this pic, too.  I guess the camellia does this every year around this time.


    Outdoor wreaths look as pretty from inside as they do outside.


    An evening view:  I think I may need to dial down the wattage on those outside lanterns.  I never realized how bright they were until I took this picture.  You'll need to wear sun glasses if you visit my house at night.  Ha!

    Did you notice the "Blue Hour" was approaching as I took this pic?  Of course, I couldn't see that through the camera--that sneaky Blue Hour.  You can read all about it, HERE.


    What's your favorite Christmas decorating idea each year?  Do you hang wreaths from your windows?  Anyone with metal windows who hangs wreaths?  If the top sash lowers, perhaps the ribbon can just drape across the top and catch when the window is raised.  My windows aren't quite snug enough for that technique, hence my use of a push pin.

    Would love to hear your technique for hanging wreaths.  Do you also use the electric candles?  Has anyone found  some really bright battery-operated candles and if so, how long do the batteries last?  Love hearing your ideas!

    Happy wreath hanging!

Help! It's Holiday Party Time!

    I love this time of year. It's crazy busy but oh, so much fun! With Thanksgiving behind us, it's time to focus on getting ready for Christmas and the upcoming holidays. Do you have an office party coming up? Any neighborhood parties to attend? Or, perhaps you'll be the one hosting this year's holiday gathering.

    Photo from O Magazine online

    Remember this awkward "social" visit in the hysterical movie, The Burbs?   I've often wished there was someone to turn to for the "how tos" and "what ifs" of holiday entertaining. Wouldn't it be wonderful to have someone knowledgeable in the field of etiquette to bounce all those questions off we have about hosting and attending holiday parties?

    Scene from movie tour, The Burbs

    Well, wish no more because BNOTP is fortunate to have a Sponsor who is an expert in the field of etiquette.  Cindy Haygood, the Training Director with the Etiquette & Leadership Institute is visiting today and she's helping us out with questions we sometimes have about hosting or attending dinner parties and holiday events.


    The Etiquette & Leadership Institute teaches/coaches anyone who would like to be come more comfortable with the etiquette expected in both business and social situations.  They also train those who would like to start their own cottage or home business, training children, young adults and others who would like to increase their confidence level in the areas of etiquette.

    Remember this extravagant Christmas party in the movie-home tour of Midnight in the Garden of Good and Evil?  What a party!  This Christmas party had it all: gossip, scandal, eccentric characters, including gun-waving guests!   Then there was that little matter of murder, afterwards.  Yep, I think this is one party where the guests could definitely have benefited from a little etiquette training. ;)


    Cindy, could you share some information about the classes you offer?  So, exactly what does the Etiquette & Leadership Institute® do?
    We are the nation’s training company that certifies and prepares etiquette consultants to teach ages 8 – 24. The week of training is dynamic, fun-filled, to motivate and inspire the next generation of etiquette ambassadors in their communities. We teach social, leadership skills along with social dance in our own community so when people come to our training we share with them exactly what we do in our career.


    Open Houses are popular events during the holiday season.  What are some some tips for hosting a successful Open House.
    Send your invitations out about 4 weeks in advance. This time of year is full of office parties, neighborhood parties, book club parties, family gatherings, holiday symphony concerts, etc. If you want an event on your friends’ calendars, give them plenty of notice!

    Always have a greeter at the door (or have different greeters covering shifts!). It does not have to be the owners of the home. Pick someone who is great at greeting and hospitality and ask them to help you with manning the door.

    Think DIY for the guests. Because people are always coming and going at an Open House, the host cannot be constantly fixing food and drink. Assign duties to eager friends, and give yourself the freedom to meet and greet and introduce your guests.

    An Open House means welcoming a lot of people into your home. Use music in the background as a “supporting cast”—and not so loud that people cannot converse.


    What are the three most common mistakes hosts tend to make when hosting a party?
    One mistake is serving food that your guests cannot eat! If you are planning a menu, ask your guests about any food allergies or special diets (including vegetarian or vegan). A great way to ask is to simply say, “Are there any foods you are not able to eat?” Once you get the conversation going, you will feel more comfortable about your menu.

    Another mistake is to over complicate the event with never-before-tried dishes…a sure ingredient for disaster. Instead of being ambitious, think simple and streamlined for success. Stay within your comfort zone and enjoy your guests.

    A third mistake is a lack of organization. Do all you can before the event—lay out all of your serving utensils, for example. In the past, I have forgotten to take something completely prepared out of the refrigerator! So now I make small labels of all of my menu items and place them on the sideboard. No one knows that they are there because the dish goes over the label, and I haven’t forgotten anything. Being organized and creating a timeline of the evening works wonders for your peace of mind and enjoyment!


    What are the three most common mistakes guests make when they are invited or attend a party?
    One very common error is a complete lack of correspondence after receiving an invitation. Guests should RSVP to let the host know whether they are coming. Some invitations say RSVP and others say Regrets Only, and there is a difference.  If your invitation says RSVP, you should call, give your name, and say whether you are attending or if you are not attending—you must let the host/hostess know either way.
    If your invitation says Regrets Only, call only if you cannot attend. If you can attend the event, you do not need to call, but you certainly do need to be present!

    A second mistake is being late. There is perhaps nothing ruder than showing up late for an event that involves food and beverages and has a set beginning time. Whatever the reason is, please call and let your host/hostess know if you are running late and give your host the freedom to go on with dinner without your presence. Arriving late just because you couldn’t get your schedule together shows that you don’t have respect for the other person’s time.


    When invited to a party, when is it appropriate to bring a hostess gift?
    Being an overnight house guest always calls for a hostess/host gift. You may bring a host/hostess gift to a dinner party, though it is not required. Bringing such a gift is a way to say “thank you,” and to share a small item you enjoy with a friend.

    If the party is given to honor or announce an event or person(s), then you would not bring a hostess gift. But, writing a thank-you note after the event to the hosts/hostesses is always appropriate.


    What items are appropriate for giving as a host/hostess gift?
    Some ideas of hostess gifts are: a bottle of wine you love, a favorite printed quote on quality paper, a home baked goodie for later enjoyment, or an item for which your area of the world is known. One item I keep to give is a small round tin of tea that holds five sachets. It is a very small item, but it is something I love, so I like to share it with others.

    Keep in mind the cultural, religious and personal backgrounds of the persons to whom you are gifting. In other words, I love to give peanuts and pecans because they are Georgia products, but I always find a way in conversation to determine whether anyone in the household is allergic to these items.


    I know the Etiquette & Leadership Institute offers classes for children and young adults, as well as those wishing to start their own business in etiquette training, but do you also offer classes for adults who feel they could use a refresher in this area?
    Yes, certainly! Many times, adults find themselves needing the polish to move up the corporate ladder and they want to distinguish themselves from the competition. One sure way is to be confident in dining and in social situations. We also offer classes for those that need to be comfortable with dancing at formal occasions. For us, teaching and helping people get ready for important moments in their life is fun and gratifying for us.


    Cindy, thanks so much for sharing all this great information.  I'll definitely be bookmarking this post for future reference since it will be a favorite to reread this time each year, or anytime I need a reminder before hosting or attending  a party or social event.

    For more information about available courses at the Etiquette & Leadership Institute, you may visit their online site by clicking the button below.

    Etiquette & Leadership Institute


    Are you hosting a party this year in your home?  Will you be attending a Christmas or holiday party?  Any challenges or concerns?  Leave a comment and tell us all about it.   Together we can figure it out!

Southern Living Idea House Mantel: Welcome to the 149th Metamorphosis Monday!

    Greetings!  How was your Thanksgiving?  I hope it was wonderful and you got to spend lots of time with family.  I drove 8 hours to Ohio to visit with my son and daughter-in-love-to-be.  I miss them and cherish the time we get to spend together.  I snapped this pic of a house near by.  I loved this particular photo because you can clearly see the American flag waving out front.


    A little closer view...


    For this Metamorphosis Monday, I'm sharing a few "small" Before and Afters--nothing earth shattering, just "stuff" I worked on today and a few random things I noticed while working outside.  My decks were covered in leaves.  I had already discarded one of my potted tomato plants and it was definitely time to pull out the other one.  The geraniums are still blooming.  It was so nice and warm here today...perfect weather for working on the deck.


    The other end of my messy, leaf covered deck.


    So here's my after...not too exciting but definitely looks better.  I also brought a lit tree out.  Do you see it there on the right inside the porch?


    Mystery Solved:
    A few months ago I blogged HERE about finding a squirrel INSIDE the screened-in porch, happily pigging out on the bird feeder I had brought in the night before.  Both screen doors was closed and latched so I couldn't figure out how he got in.  I looked at all the screens and couldn't find any holes.


    Today, as I was blowing leaves off the decks and trying to clean out the leaves that get trapped between the screening and rails, I noticed some small punctures in a screen.


    And just to the left of all the punctures I found this.  Now I know how Houdini Squirrel got in.  He chewed himself a door right through the screening.  :(


    Fortunately, the screens are removal.  I remember my contractor/builder showing me how easy it would be to remove one to take it in to have it "re-screened" if one ever got damaged.  Time to put that to the test.


    My Debutante camellia is blooming up a storm.  It normally blooms later than this, usually during the winter.   I think the warm weather we've been having has sped the process up and it's confused.  (View tablescapes with Debutante camellias HERE and HERE.)


    I should cut some of the blooms and bring them in to float them in a bowl, like I did HERE.


    We have a cold front headed our way and these beautiful blooms will unfortunately be toast in another day or two.


    Besides my wee deck metamorphosis, I have another little "Before and After" to share today. Last year I had the pleasure of touring the Southern Living Idea House in Senoia, Georgia.   The Christmas decorations were amazing.  You may remember this beautiful mantel I shared HERE right after I took the tour.  Note the bee pillow on the sofa.  Does it look familiar?


    Yep, it's the same one I have in my home office/studio.  I totally didn't remember that pillow being in the idea house until I searched back for a picture of the mantel for this post.  Too funny.


    Here's a close up of the mantel when I visited the Idea House.  I could tell the mantel was a bit past its prime, but it was still beautiful.  Beth from Unskinny Boppy  recently alerted me to a photo at Southern Living online showing this mantel in its earlier days when it was still fresh.  So this is sort of a reverse Metamorphosis.  Here's the pic I shared of the mantel late in the holiday season.


    And here's how it looked when it was newly finished and a bit more lush.  Gorgeous!   When I posted about it previously, HERE we all spent a good deal of time trying to figure out what plants/greenery had been used to complete it.   You can read more about what was used to create this beautiful mantel, and get tips on how to create it at Southern Living online.


    Pssst:  Winner of the P.C. Fallon Co. Giveaway was announced HERE on the giveaway post.

    Looking forward to all the "Before and Afters" for this Met Monday!

    Links to past posts referenced above:
    Houdini Squirrel
    Floating Camellias
    Tablescapes with Camellia Centerpiece HERE and HERE
    My home office/studio with the bee pillow
    Southern Living Idea House   (To view additional posts showing the Southern Living Idea House in Senoia Georgia, type "Southern Living Idea House" into the search box you'll find on the right sidebar.  I took pics throughout the home and you'll find several more posts showing the rooms in this beautiful home.)


    To receive the latest posts, as well as updates about blog parties, subscribe via an RSS Reader or have BNOTP delivered right to your Inbox.  You'll find links to subscribe via RSS and Email on the sidebar to the right.  Thanks for reading; so glad you are here!

    Reading this post via e-mail or RSS feed?
    *If you are reading this via email or RSS feed, to view all the Before and Afters linked for Metamorphosis Monday, click HERE.


    Metamorphosis Monday:
    If you are participating in Metamorphosis Monday you will need to link up the permalink to your MM post and not your general blog address. To get your permalink, click on your post name, then just copy and paste the address that shows up in the address bar at the top of your blog, into the "url" box for InLinkz.

    If you'd like to include the MM button in your post, just copy and paste the Met Monday button to your computer or grab the html code from underneath the MM logo under the "BNOTP Parties" header at the top of this blog.

    In order to link up, you'll need to include a link in your MM post back to the host blog, Between Naps on the Porch so your regular readers will be able to find the Met Monday party which ensures your friends and fellow bloggers will receive lots of visits, too.

    PLEASE DO NOT type in all caps...it spreads the links waaaay out. Thanks!

    Let's try something fun today! Please visit the person who linked before you and after you...that way everyone will get some visits. Hope you'll visit more, of course.


    Welcome! Thanks for coming to the party!

Blog Archive

Total Pageviews