My Secret Weapon for Clean Shiny Windows & a Giveaway!

    Window cleaning is not real high on my list of favorite things to do.  I'm guessing it may not be too high on yours either.  How is it that windows get so dirty anyway?  I know how they get dirty outside where rain, pollen and other outside elements abound, but what about on the inside?  It's kind of a mystery.

    Recently, the good folks at Fish Foam, a Sponsor with BNOTP and experts in the science of window cleaning, offered to send some of their window cleaner so I could try it here in my home.

    Fish Foam

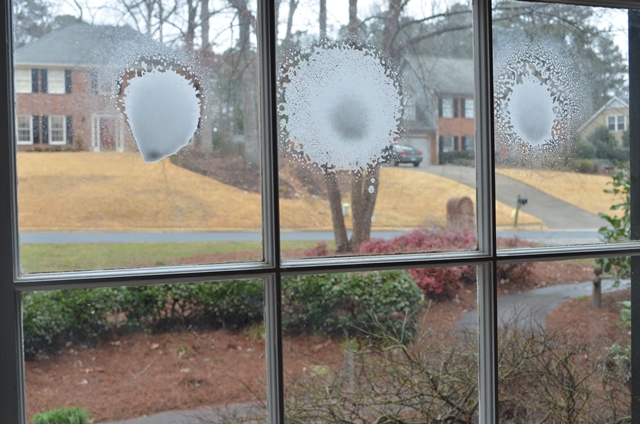
    I thought I'd give it a try here in the dining room.  The windows didn't look that terribly dirty, but it had been a while since they were last cleaned.  Now that I think about it, I can't remember when they were last cleaned.  Yikes.  As you can see, it was an overcast day out.


    Prior to cleaning, I noticed a few streaks/smears like the one visible below, but overall I thought the windows were fairly clean.


    I sprayed some Fish Foam on each pane and the first thing I noticed was it didn't make a beeline for the wood frame of the window like most window cleaners do.  It stayed where I sprayed it.  Cool!

    I've always disliked cleaning windows because you have to hold the cleaner the whole time, spraying one window pane at the time while trying to beat the cleaner to the bottom of the window with your other hand.  Not so with Fish Foam.  It stays put, so you can spray a bunch of panes at once, put the can down and clean away.  That makes the process easier and faster...kind of like batch cleaning.


    After I cleaned on the inside, I went outside and cleaned the other side, as well.  I was shocked by the difference when I was done.  This window that I didn't think was that dirty...well, take a look now.  Much better!  I'm not exactly sure what's in Fish Foam but whatever it is, it works.  No scrubbing or elbow grease needed.  And no stinky ammonia to take your breath away.


     Clean and streak free...awesome!


    By the way, if you love shiny, clean windows but would rather leave the cleaning to the experts, Fish Window Cleaning will do the job for you.  Visit Fish Window Cleaning and enter your zip code in the box on the left side bar to find the nearest location to your home.


    Here's a side by side comparison.  I don't think I need to tell you which side is the Before and which is the After.  I took both pics with the same camera setting, same lighting, same lens, same everything.  You would swear I had a screen on the window in the Before pic, wouldn't you?  I had no idea my windows were so dirty.  It's like they were covered with a thin layer of grime.  Yuck.  This has totally inspired me to clean all the others.  I'm going to download a new book from Audible this weekend and get cracking.


    Update:  Several folks have asked in the comments where to order Fish Foam.  Click on this picture below and it will take you to their site where you can order.

    Fish Foam


    Giveaway from Fish Foam:  3 Winners!


    Fish Foam is giving away a 3-pack set of Fish Foam to three (3) BNOTP readers.

    How to Enter: 

    1. Just leave a comment on this post to be entered.  If your comment will show as "anonymous," please be sure to leave your name/email in the comment so you can be reached if you should win.  As always, you do not have to be a blogger or have a blog to participate.


    2. For a second chance to win, "LIKE" Fish Foam on Facebook, HERE.

    3. For a third entry, "Follow" Fish Foam on Twitter,  HERE.

    4. For additional entries, share this giveaway on Twitter or Facebook.   Feel free to use the share buttons below for an easy way to share this giveaway.

    *Important:  Be sure to leave a comment for each entry since I'll be using the Inlinkz Random Number Generator to select the three winners.

    Please Note:  Due to shipping costs, this giveaway is limited to residents of the contiguous United States.   Product will ship via UPS.  Giveaway ends Monday,  February 20th at midnight.

    Best of luck to everyone!

Eye Candy for Valentine's Day

    Happy Valentine's Day!  Did you get a chance to visit the wonderful Before and Afters posted for yesterday's Met Monday?  I was once again blown away by all the wonderful talent and creativity in Blogland!

    I started to name today's post, "Hijacked" because this post started out with one topic and it kind of morphed into something else.  You'll see what I mean in a sec.

    If you've been reading BNOTP for a while, you probably remember this little feather tree.  I found it one Christmas for 50% off at Michael's and placed it here in the guest room.


    This past Christmas I decided to use it in the upstairs family room, instead.  I know you can't tell, but it's decorated with clear, etched glass orbs, crystal-like garland and a crystal/beaded snowflake on top.   Well, the squeaky wheels started turning and I thought, hey, wouldn't a feather tree be cute decorated for Valentine's Day?  Hold that thought.


    Last Thursday I posted this Valentine's Day table setting.  (Click link to view.)


    The centerpiece included hearts I covered with sheet music (tutorial can be found HERE) and pink glass hearts I found on eBay.  A dearheart mentioned in the comments on the tablescape post that the pink hearts were also available at Jo-Ann's.   I was planning to reuse these pink hearts on the feather tree, but with this new development another idea popped into my fuzzy little brain.  Off to Jo-Ann's, I did go.


    Not only did Jo-Ann's have the adorable pink hearts, they were half price, too!  At $4 for a dozen, I bought several boxes.  They had one box of red hearts left, so that one came home with me, too.  After paying $17 for one box on eBay, I couldn't resist buying several at this awesome price.

    Using this amazingly soft, pink yarn called Angel Fleece, I strung the pink hearts together to create pretty, heart garland for the feather tree.  I attached more of the Angel Fleece yarn to the red hearts and they became ornaments for this Valentine's Day tree.  The tree topper is a heart from the garland I used to decorate the guest bed in yesterday's Met Monday post, HERE.


    Remember this little pitcher from yesterday's post? I'm so glad I cut the daffodils from the garden a few days ago.  Tonight they are forecasting snow flurries and I've been hearing something that sounds like ice crystals falling all evening.  The "Love" pitcher came from Old Time Pottery a few years back.  It was the centerpiece for this Valentine's Day table setting.


    Now here's where this post gets hijacked.   This post was supposed to just be about making heart garland with pink glass hearts and soft pink yarn, but I got distracted.  Yesterday, I purchased a couple of lenses I've been hoping to add to my picture taking arsenal.  The photograph below was taken with a  Nikkor 35mm f/1.8G lens.   I didn't use the tripod for this shot, so it's not quite as crisp as I'd like.  But I am loving how this prime lens laughs in the face of low lighting.


    This was also taken with the 35mm.


    The other glass I've been not-so-patiently-waiting-for is a macro lens.  I had planned to buy a 60mm lens but the store manager recommended the Nikkor 85mm since it has VR (vibration reduction).  So, I went with the Nikon 85mm micro lens since I may not always have a tripod handy.  (Nikon calls their macro lens a micro lens, but it's the same thing.)

    So, this means, I have no more excuses for not bringing you in close for some detailed shots of tablescapes and the other goodies I post about.


    With a little cropping, we can get insanely close.  Okay, I won't always take you this close, I'm just testing the boundaries right now.   I love how you can even see the little fuzzy fibers surrounding the strands of the Angel Fleece yarn.


    I do love this macro lens.  I took these pictures using a tripod and my next purchase will most likely be a remote shutter release so I don't have to actually touch the camera to take the photo.  When you're using a macro lens, the less chance of movement, the better.

    All the photos I posted for last weeks Tablescape Thursday and yesterday's Met Monday were taken in Manual mode.  I'm rarely shooting in Auto now because when I'm taking photos facing into bright light (like the porch windows for last week's tablescape and the guest room windows for yesterday's post) the auto setting just isn't getting the job done.


    Back to the original purpose of this post...if you buy some of these adorable hearts, they also look great strung on jute for a more casual, shabby cottage feel.  I think they would be adorable strung across a mantel, a headboard, the top of a secretary or armoire, in front of a window...really just about anywhere.  And why not keep them out all year!

    I used a Larks Head knot to attach my hearts spacing them out about 9 inches apart.  Attaching them with the Larks Head knot made the process fast and easy.  If you aren't sure how to tie this knot, just Google it and you'll find a demonstration on You Tube and several online sites.  By some miracle, I still remembered how to make that knot from my macrame days.  Can't believe I can even still remember what it's called.  It was such a common knot with macrame, I guess it has stuck with me.   Even if you don't use it for this, it's a good knot for hanging decorative tassels and other such things.  Just google and there are numerous tutorials...and it's easy.


    Happy Valentine's Day!  Hope your day is extra special. ♥

Decorating for Valentine's Day: Welcome to the 160th Metamorphosis Monday!

    Valentine's Day is tomorrow.  I love that holiday.  How can you not love a day that's all about chocolate, romance and  LOVE! 

    It makes me smile when I remember bringing Valentine's Day cards to school.   If I close my eyes, I can still see all the colorful construction-paper folders we made and decorated.  They were strung along the wall where they patiently waited to be filled with sweet valentines.

    When February 14th arrived, the classroom became a little bee's nest as we scurried around carefully placing the tiny envelopes in the correct folders.  Do you remember the night before, reading the valentines and carefully choosing just the right valentine card for each friend, especially if that friend was your classroom crush?

    Oh, the excitement of opening the valentines the next day!  I always wondered what those little envelopes would hold.  Would it be candy, a message from a "secret admirer" or just a friendly valentine?  Maybe it was all those Nancy Drew books I was reading.  Whatever it was, I loved and still love the mystery and intrigue of this special day.

    This Valentine's Day, my crush is you.  Will you be my Valentine?  ♥  Check: Yes √ or  No √.  ;)


    The guest bedroom received a little Valentine's Day decorating.


    I fell in love with this cute garland from Pier 1.  It's made from a very heavy, felt type material.  At first I thought I'd just make my own...until I realized it was only $6.  I don't think I could make it for that.


    A pretty pink ribbon held the garland in place.


    Even the daffodils were excited about Valentine's Day this year, blooming a whole month early so they could lend their sweet scent to this special day.


    In case you're wondering why there's a butter dish (complete with a knife no less) there on the secretary, it will make sense in THIS post.  There really is method to my madness...well, most of the time.


    I was hoping you might be stopping by so I have a little Valentine's Day treat ready.   Love this heart shaped napkin fold.  I'll create a tutorial for it soon...it super easy to make.


    I hope all your Valentine's Day wishes come true...and then some.


    You'll find  additional Valentine's Day craft, decorating and table setting ideas under the "Holiday" category at the top of this blog.

     Happy Valentine's Day! ♥ 


    Looking forward to all the Before and Afters for this Metamorphosis Monday!

    To receive the latest posts, as well as updates about blog parties, subscribe via an RSS Reader or have BNOTP delivered right to your Inbox.  You'll find links to subscribe via RSS and Email on the sidebar to the right.  Thanks for reading; so glad you are here!

    Reading this post via e-mail or RSS feed?
    *If you are reading this via email or RSS feed, to view all the Before and Afters linked for Metamorphosis Monday, click HERE.


    Metamorphosis Monday:
    If you are participating in Metamorphosis Monday you will need to link up the "permalink" to your MM post and not your general blog address. To get your permalink, click on your post name, then just copy and paste the address that shows up in the address bar at the top of your blog, into the "url" box for InLinkz.

    In order to link up, you'll need to include a link in your MM post back to the party.

    If you'd like to include the MM button in your post, just copy and paste the Met Monday button to your computer or grab the html code from underneath the MM logo under the "BNOTP Parties" header at the top of this blog.

    PLEASE DO NOT type in all caps...it spreads the links waaaay out. Thanks!

    Let's try something fun today! Please visit the person who linked before you and after you...that way everyone will get some visits. Hope you'll visit more, of course.

    Welcome! Thanks for coming to the party!

How to Make Music-Covered Hearts for Valentine's Day: A Tutorial

    Yesterday for our Tablescape Thursday, I shared a Valentine's Day table setting with a sweet, romantic easy-to-make centerpiece.  I had been plotting thinking for some time about creating a willowy little "tree" with the River Birch branches I'm always picking up from my front yard.  


    I decided to decorate my little birch tree with hearts so I checked several places online.  During my search I came across some cute, papier-machéd, music covered hearts and I loved the look, but not so much the price, especially since  I knew I would need a good many to fill my tree.    

    So, I began thinking about how I could make hearts similar to those I had seen online.  I really didn't want to papier-maché the hearts so I decided to shop the discount stores for inexpensive, small hearts for decoupaging.  I'm still sort of new to this decoupaging thing, having just tried it out for the first time back around Halloween when I decoupaged a couple of pumpkins in THIS post and THIS post.  But I figured, if you can decoupage pumpkins, why not little hearts.


    I headed off to Dollar Tree and found some small, plastic "box" hearts that were about the size I wanted.  But the shape just wasn't quite right...they were definitely boxy.  

    Next up, Big Lots, where I encountered a she-car with eyelashes in the parking lot.   You can see her at the end of THIS post. 

    Inside Big Lots I found just what I needed and they were only $3 for a dozen!  Awesome!  This was looking promising!   I also bought them in the smaller size.  I didn't use those but I think I'll keep them...they may come in handy for a future project one day.


    Once back home, I googled sheet music and found several places online with sheet music images.  I printed them off and cut them up in to varying sizes/pieces.

    Pssst:  If you would like your sheet music to have an aged look, you may wish to stain the paper with tea leaves or use another aging method prior to cutting it up

    Then it was time to get my Mod Podge on.  Mod Podge (MP) and I are old friends after our pumpkin days together.  I didn't try to match things up, just applied the MP on the back of each little piece of paper and stuck it on the heart.  I did this while listening to books and pod casts online, so it actually went pretty fast.


    Once I had each heart covered with music, I put a light coat of Mod Podge all over the whole ornament and let it dry.  That didn't take long; MP dries quickly.  By the time I had all 12 hearts lightly coated, the first few were already dry and ready for the next step....attaching a ribbon.

    I removed the tiny gold hanging string that had come on the red hearts and with a teeny bit of hot glue, glued a loop of ribbon to the top of the heart.  I started out using white ribbon.


    But I switched to pink for a little extra color.  Plus, I knew the pink would work well with some pink mercury glass ornaments I found on eBay.


    There's a little raised area on the top of each heart where the tiny gold hanging strip used to be.  I wanted to camouflaged the hot glue I had used to attach the ribbon, so I put a little craft glue on the raised area and sprinkled lots of pretty silver glitter over the glue.  I never knew how much fun glitter could be.  Messy, but so much fun!


    I tied little bows from left over ribbon and I held them to the top to see how they would look.  Too fussy, I decided.  I thought seriously about adding a little puff of pink feathers at the top where the hanging ribbon attached, but I wasn't able to find pink feathers and my time was running out. I ended up using the hearts as they were, but I still like the feather idea a lot.  It would soften the look of the tree a bit.  I may add them, yet.


    I did add a tiny bit of embellishment to two hearts.  I placed a little glue on the center of two hearts, in the shape of a heart...and glittered them up.


    This centerpiece has lots of possibilities.  The branches could be sprayed painted white, pink or pale blue for Easter...then we could create an Easter or Springtime tree.  I have another little idea brewing in my mind for this spring, too.

    Oh, when placing branches down into a container, you can use floral oasis or wire or whatever you wish down inside to help hold the branches.  I got lucky with this container because it goes pretty deep and it narrows dramatically inside.  So I just stuck the branches in and shifted them around a bit and they stayed.  I didn't have to use anything down inside to really hold them.  When I tucked the moss in, I did put some of it down a little into the bowl part of the urn to help secure the branches a bit more.  But the moss was more decorative than supportive.  You could stick paper down inside...really whatever you have on hand that will keep your branches in an upright position.


    This centerpiece was super budget friendly.  I already had the urn...it was an inexpensive find ($12) a few years back from A Classy Flea.  The branches were free for the cleaning up taking from my front yard.  The moss around the base of the branches was left over from THIS moss covered table.  The sheet music was just printed from online and it only took a few sheets to cover all 12 hearts.  I already had the Mod Podge from my pumpkin decoupaging days.   So, the only expense was $17 for a dozen pink Mercury glass hearts and $3 for the plastic hearts (that got decoupaged) from Big Lots.  Update: JoAnn's has the pink and red mercury glass hearts (just like the ones I used) for $7.99 and right now (as of 2-11-12) they are on sale 50% off!  Awesome deal!)


    So there ya have it...an easy, fun, inexpensive way to make a dozen music-covered hearts.

    Happy Friday and Happy Crafting!  What plans do you have this weekend?  Any crafting plans?

Valentine's Day Table Setting: Welcome to the 180th Tablescape Thursday!

    Valentine's Day is just a few days away.   Did you forward your Valentine's Day cards to the Valentine, Texas Post Master to have them postmarked with their famous stamp?  Such a cute idea!


    We've been having spring-like weather for weeks here in Georgia.  Even the daffodils are in full bloom.  The porch was calling, begging me to come out and play.   Just look at all that glorious sunshine!


    A simple centerpiece worked well for this table setting.


    Sheer napkin sheaths are layered over April Cornell napkins found while antiquing a few years ago.


    On another past antiquing adventure, I found 27 pieces of this International china for just $14.  I filled in with a few more pieces from eBay.  The pattern is Glenwood and depicts a pretty gardenia in the center.   Homer Laughlin made this same pattern...not sure of the pattern name, though.


    The stemware sparkled in the beautiful sunshine.  Iced tea glass is Waterford, pattern is Araglin.  The goblet is Vendome Clear by Noritake.  (Vendome Clear stemware can also be seen THIS Halloween table setting.)


    I wanted a simple centerpiece for this Valentine's Day soiree, so I gathered shed River Birch branches from the yard and tucked them down inside a shabby urn.  You may remember this urn from THIS table setting when it was filled with roses, daisies and Creeping Jenny.


    The branches were adorned with pink mercury-glass hearts and hearts decoupaged with sheet music and glitter.  Today, we'll imagine the music is all love songs.


    Recently I saw papier-mâchéd, music-covered  hearts on Etsy and I decided to try making my own.  I'll post a little tutorial showing how I made them soon.  These are not  papier-mâchéd, they were actually much easier to make than that.  I didn't antique the music/paper, just left it white to contrast against the branches.  It would be easy to "antique" the sheet music for an aged look, though.


    I know it's kinda hard to see but there's a little, silver-glittered heart in the center of this one.


    I tucked moss (left over from THIS mossy table setting) around the base of the River Birch branches.


    On Tuesday evening I was able to snap a few pics during the Blue Hour.  (You can read all about the blue hour, HERE.) Isn't that just the most amazing color of blue?  And I didn't do anything to this photo, no editing at all.  This is how it came out of the camera.  The blue hour is amazing, isn't it?


    Happy Valentine's Day, dear friends!


    Looking forward to the beautiful tablescapes linked for this Tablescape Thursday!


    For additonal Valentine's Day table settings, click on the "Holiday" category at the top of this blog.  Or, click on the "Tablescape" category above and scroll down to "Holiday Tablescapes."

    Resources:
    Chargers:  Neiman Marcus or Horchow 4 years ago
    China: International, Pattern is Glenwood, found antiquing and on eBay
    Flatware: Towle, King Richard
    Crystal Stemware: Iced Beverage, Waterford, Araglin; Goblet: Vendome Clearprovided by Noritake
    Napkins: April Cornell, found while thrifting
    Sheer Napkin Sheaths: Local home decor shop
    Napkin Rings: The Style Sisters Shop
    Mercury Glass Votive Holders: Pottery Barn
    Candles: Provided by Colonial Candle
    Pink Mercury Glass Hearts: eBay
    Music Covered Hearts: Created for tablesetting, Tutorial coming soon.

    To receive the latest posts, as well as updates about blog parties, subscribe via an RSS Reader or have BNOTP delivered right to your Inbox.  You'll find links to subscribe via RSS and e-mail on the sidebar to the right.  Thanks for reading; so glad you are here!

    Reading this post via e-mail or RSS feed?
    *If you are reading this via email or RSS feed, to view all the tablescapes linked for Tablescape Thursday, click HERE.
    Please Read:
    If you are participating in Tablescape Thursday, please be sure to add your permalink below, and not your general blog address. To get your permalink, click on your post name, then just copy and paste the address that shows up in the address bar, into the "url" box when you link up.

    You'll need to include a link in your post back to the party in order to link up and participate.  That's so visitors to your blog will be able to find the party and  the other Tablescape Thursday participants.

    If you would like to use the Tablescape Thursday logo button in your post, just copy and paste it to your computer and upload it to your post as you would any photo. Or, grab the html code you'll find under the "Parties" heading at the top of this blog.

    Please, don't add your post name/blog name ALL IN CAPS...it tends to create big spaces between the rows of links. Thanks!

    Let's try something fun today! Please visit the person who linked before you and after you...that way everyone will get some visits. Hope you'll visit more, of course.

    Welcome! Thanks for coming to the party!

Total Pageviews