Another Closet In The Making

    I’m working on my teenage son’s closet.  It is a walk-in closet but it is the tiniest of all the bedroom closets. 

    {remember my youngest son’s walk-in closet that is 16 feet long?}

    Walkin Closet

    Closet at it’s current state:

    • Walls, ceiling, and baseboards are painted.
    • Closet rod and brackets are installed.
    • Shelves and shelving-brackets are primed and painted. {hoping to have installed this weekend}

    Closet Self Layout

    Here is what my father has to deal with. LOL. 

    I make a quick phone call to let him know I’ve got a new project for us and he kindly replies, “Alright. Come on over.” 

    I sketched out plans for two shelving units and two shelves.

    MDF Closet shelves

    And here’s one part of what I’ve sketched out on paper. 

    A shelving unit made of MDF.

    MDF Dato Blade Cuts 

    My dad sets up his Dato Blades on the table saw.

    {What’s a Dato Blade?  Several blades stacked together to your determined width.} 

    In this case, the Dato is set up for 3/4 inch to accommodate the width of a MDF board.  The height of the blades are adjusted so that it only cuts half way into each side board.

    Free Floating Shelf Hanger

    These shelving units are going to be a little different from my youngest son’s closet unit.  Instead of setting on the floor, the two units will be anchored to wall.  {by these wooden brackets pictured above} My oldest son’s room has taken on a more modern feeling and I want to carry that over in to the closet.  This is why I used galvanized pipe and chrome brackets to hang his clothes from.

    Check back for the final reveal. 

    {I hope I’m able to photograph this less than 4 foot closet?!?!?}

    Carrie


Sketch Floral Makes Its Debut! Welcome to the 110th Tablescape Thursday!

    Give-a-Way for Modern Butterfly Dinnerware by Mikasa
    All this week we've been celebrating with a fabulous Give-a-Way! Mikasa has generously donated four, 5-pc place settings of Modern Butterfly to a reader of BNOTP! Thank-you to everyone who took a moment of their time to enter. I loved reading your choices for your fave Mikasa pattern.

    The winner of the random drawing is Cherry Kay who blogs at Entertaining Women. Congratulations, Cherry Kay! Please e-mail me your address and I'll forward it to Mikasa. Thanks Mikasa for this wonderful Give-a-Way! If you didn't win this time, take heart. We will be having similar giveaways in the future.


    Tablescape Thursday:
    Welcome to a very special week of Tablescape Thursday! I am sooo excited to share my table setting with you this week because tonight, I'm sharing beautiful dinnerware that is just about to make it's debut! In just a few days, Sketch Floral will be available for purchase in retail stores, but you're getting a little sneak preview here this evening! :)


    Even though it was early afternoon when these pics were taken, the autumn sun isn't near as bright as the summer sun. If almost felt like evening time here on the porch.


    It began to get darker, and I lit the candles as long shadows fell across the porch...


    I love candlelight...so I don't mind the shadows coming a bit earlier these days.


    This picture was taken a little earlier in the day...so the candles were not lit just yet. I decided to keep the centerpiece very simple using all white candles and candlesticks. I took a ribbon and bow I have been saving for years...do you do that...save ribbon and bows? It was just the right length to fit around my candle centerpiece and the colors were perfect for my tablescape.


    For my centerpiece, I took the base of the glass-domed server you saw used HERE and I added white candles from Colonial Candle.


    As sunlight seeped away slowly from the porch, the candles grew brighter and brighter.


    Centerpiece all aglow...


    Sketch Floral is a beautiful porcelain china with a delicate floral pattern. This photo was taken with soup bowls at each place setting.


    Sooo romantic. A pattern this beautiful deserves equally beautiful napkins. Vintage, embroidered napkins just felt right with this china.


    Pretty berry napkin rings are available at The Style Sisters Shop...you'll find them in all colors. I love the soft pink with the Sketch Floral pattern.


    This pattern has matching mugs...perfect for coffee, hot tea or cider after dinner...


    A few evening candlelight pics...


    I didn't realize I was taking pics during the Blue Hour until I saw this photo later. :)


    Hope you enjoyed this sneak preview of Sketch Floral. After you visit all the wonderful tablescapes posted for this TT, click HERE for a little more tablescape inspiration.


    Chargers: Neiman Marcus, years ago
    China: Provided by Mikasa, Pattern is Sketch Floral
    Glassware: Pier 1
    Flatware: Towel, King Richard
    Napkins: Vintage, found in local antique shop
    Napkin Rings: Provided by
    The Style Sisters Shop
    Centerpiece: Base found at Marshalls, months ago
    Candles: Provided by
    Colonial Candle

    The Legal Stuff:
    The china used in this tablescape was provided by Lifetime Brands, Inc. BNOTP is not an employee nor an affiliate of Lifetime Brands, Inc. so the opinions expressed here are mine and do not necessarily reflect the opinions of Lifetime Brands.


    Looking forward to viewing your beautiful tablescapes!


    Please Read:
    If you are participating in Tablescape Thursday, please be sure to add your permalink below, and not your general blog address. To get your permalink, click on your post name. Then just copy and paste the address that shows up in the address bar at the top, into the "url" box for the picture linky. You'll also need to put your e-mail address in, but don't worry, it will not be visible to anyone.

    I'd love for you to use the Tablescape Thursday logo button in your post. To do that, just copy and paste it to your computer and upload it to your post as you would any photo. Or, just grab the html code posted on the sidebar under the TT button.

    Please, link back to the host blog, Between Naps on the Porch. This is important because it helps those who are visiting your blog, find the other wonderful tablescapes posted for this Tablescape Thursday, thus increasing visits for all participants.

    Please, do not add your link below, until your tablescape post is actually published to your blog.

    Please, don't add your post name/blog name in ALL CAPS...it tends to create big spaces between the rows of links. Thanks!

    Let's try something fun today! Please visit the person who linked before you and after you...that way everyone will get some visits. Hope you'll visit more, of course. :-)


Halloween Sign FREE Download

    If you created one of these 

    IMG_1412

    and would like to change it to this

    Halloween Treat Sign

    You are in luck!

    I have created a “TREATS” download!

    The original family wall hanging was done using scrape book paper and vinyl letters.  For the “TREATS” sign,  I turned the original sign around, using the back of each block, designed the letters in Photoshop, and then printed out on glossy photo paper.

         Click to download (either .psd or .jpg)

        Page 1 “T,R,E”.psd                                                 Page 1 “T,R,E”.jpg 

       Page 2 “A,T,S”.psd                                                 Page 2 “A,T,S”.jpg

Simply Fit Shade Winner

    I’m so honored to announce the WINNER of 

    Dittle Dattle’s 1st Giveaway

    according to Random.org the winner of the Simple Fit Shade is

    Nicole at Coffee Talk

    Redi Shade Simple Fit

    Congratulations Nicole!!!

    You will be receiving an email soon.

    and thanks to all you gals that entered :D


A Fall Door Basket

    My Fall Basket:

    Well, I took everyone's combined advice and I:

    1. Decided to keep the fall basket on the door since most of you liked it. I made it taller and skinner so I think it looks much better...less wide and overwhelming on the door.

    And

    2. I cut the whiter flowers off the bunch of sunflowers they were attached to. I dispersed them throughout the arrangement. For some reason, they looked a lot whiter in the photos I shared with you guys then they come across in person. In person, the centers of the white flowers are sort of creamy yellow. They look a lot better dispersed throughout the arrangement (now that I cut them off) instead of clustered along the bottom which is where they had somehow ended up since they are part of the sunflower bunch of flowers.

    Sorry these pics were taken after dark...but hopefully you can see the changes I made...


    I'm still looking for something viney and trailing to add along the bottom...

    At the end of the fall season, I'm going to take this baby apart and buy some chicken wire to poke down in the basket...see if that will make arranging the flowers a little easier...that was another suggestion you guys had. Thank you to everyone!

Tuesday Tip Tablescape Arrangement

    I’m am not an expert at tablescape arranging but I have learned a few things as I have spend a good bit of last week putting together my foyer table and a treat table in the living room. 

    Let me share with you what I’ve learned……

    Tuesday-Tipster-000-Page-1

    Basic guidelines for creating  your own tablescape.

    {Supplies}

    • Light~ Lamps, candles {okay maybe both}
    • Hard Objects~ Picture frames, books, trays, plates, or mirrors
    • Greenery & Natural Items~ flowers, leaves, branches, nuts, fruits, baskets, or small foliage
    • Fabric Element~ napkins, table runner, dolly,  or ribbon

    {Suggestions}

    • Try to take up no more than 1/3 of the tables surface, unless the table doesn’t intend to be use and will remain purely decorative.
    • Arrange items so the heights stagger.  Stacking books is a great way to add lefts and levels.  Use candle sticks,a lamp, or even a vase filled with branches as your tallest height and work with other smaller display items to fill and complete your tablescape.
    • Odd numbers are more appealing to the eye.  Group items in 3’s,5’s, or even 7’s. {think children's books ~ “The Three Little Pigs”, “Snow White and the Seven Dwarfs”, “Goldie Locks and the Three Bears”}
    • Just as an artist paints a scenery, your table arrangement needs a foreground, middle ground, and a background.  You can create depth even on a small shelf!
    • Limit the color palette to just a few colors. 
    • Try to use “real” objects.  Items that you really use in and around your home.  Magazines, books, letter opener, reading glasses, candy :D
    • Create a focal point with either a large mirror or artwork
    • Overlap items.  Let one object break the line of another object.


PB Inspired Bed Assembly

    Before assembling my teenage son’s PB Inspired Bed Set I snapped some photographs. 

    I hope this will help answer some of the questions that I’ve had from my younger son’s bed

    Both bed sets are made for a full size bed but can easily be adjusted to fit a queen size bed.

    PB Inspired Bed Frame

    These headboards are inspired by the “Hudson Collection” from Pottery Barn.  We {my father and I} used the measurements provided in the catalog to determine the height and for the width we measure the mattress.    The MDF board in the center is cut to the width of the full size mattress.  The width of the 4x4 post is what allows the bed to expand to a queen size.

    PB Inspired Headboard

    On top of the MDF board, we made, glued, and nailed two picture frames.  Next attach the 4x4 post to the sides with glue and nails.  The post and the MDF board are of the same height.  A 2x8 board sets on top.  Lastly we add molding to the front and a small piece to the sides just under the 2x8 top board.

    ***I had numerous questions about the 4x4 post made of MDF!  I plan on doing another post showing how easy these are to make.

    PB Inspired Bed Frame Brackets

    To attach the side rails (2x10 boards) to headboard and footboard we used an “L” bracket on my youngest son’s bed.  However, this left a small gap between the boards.  So when assembling my teenager son’s bed, we tried a combination of two brackets.  This worked perfectly!  Not only did it get rid of the gap……this bed is incredibly strong and sturdy!!! A good thing for young boys :D

    PB Inspired Bed Frame Assembly 

    Attached to each of the side rails is a small cleat (about 1x2) and running horizontally from cleat to cleat is a 1x3 board.  We used five 1x3 boards across and screwed in place.  These boards are very inexpensive cuts of wood.  I think they were less that a dollar each.

    PB Inspired Back of Footboard

    The footboard is made the same way as the headboard except……

    • obviously the overall height is smaller
    • the top board is a 2x10 (instead of the 2x8) – this allowed the top board to hang over just a bit on both sides
    • we also added a small piece of molding to the back board of the footboard- this gave added support as well as being decorative

    Molding Cut too Short 

    And the whole project would have taken less time if my father didn’t have to keep fixing my mistakes….. lol

    “Measure TWICE and cut ONCE”

    Honestly my father did such a great job fixing this boo~boo of mine that I had a hard time getting a photograph to show it!

    I hope that clears a lot of questions and please come back to see how to make your own 4x4 post!

    Please don’t forget to enter the Redi Shade Simple Fit Giveaway

    Giveaway ends September 28th at 10:00 (est)

    Carrie

Welcome Fall With an Autumn Basket for Your Front Door! Welcome to the 89th Metamorphosis Monday!

    I need your help today...I can't see the forest for the trees...so tell me what you think. I have a pretty fall wreath I sometimes place on my door...but this year I thought I'd try a basket instead. Here's how my front door has looked all summer. (Joining in Rhoda's Fall Door party HERE!)


    Nice, but time to put this look away and welcome in the fall season...


    I found this large basket recently while out antiquing and I loved the warm, rich color of the basket...it just said autumn leaves, cozy fires in the fireplace, and warm, woolly mittens. Yep...that's what it said...so I couldn't leave it there...it had to come home with me.


    I bought a bunch of fall silk flowers...more than I figured I would need...because it's a HUGE basket. I knew it would take a lot to fill it. I even bought a few pumpkins/squash thingies in case I wanted to work them into the arrangement.


    I stuffed newspapers into the very bottom...and added styrofoam on top. I stuck the stems of the silk flowers into the styrofoam. I left the tags on...just in case I didn't like the look. I can cut them off later if I decide to keep them all. Silk flowers are soooo expensive, so I have to make sure.


    Next, I put newspaper in around the stems to help hold them...and wedged in more styrofoam. These plants were pretty heavy and needed a lot of support.


    I added floral moss from Dollar Tree on top.


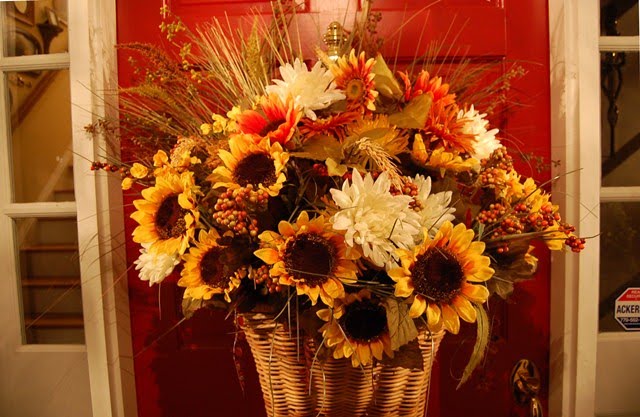
    Ready for the reveal? Be honest...tell me if it just looks too big.


    Someone mentioned about removing the white flowers...I tend to agree. But they are part of the whole sunflower bunch...connected together. So maybe I'll return that bunch for a different bunch. The white flowers do tend to stand out a bit against all the fall colors....not sure I like that. What do you think?

    Update: I took a look at them and in person they don't seem so white. I'm not sure why they look so white in the pics. I may leave them since they aren't as white in person. :)


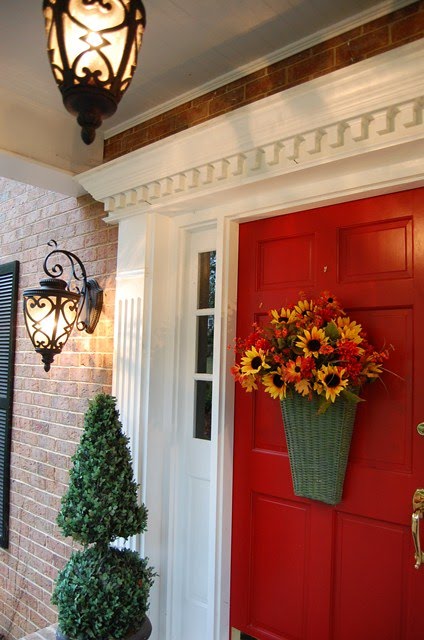
    Here's another alternative...a basket I used last year on one of the doors going out to the screened-in porch.


    Nah...not crazy about that green basket against the red door. I think I'll use this back on the screened-in porch again this year.


    So, is the basket too large? Should I return all the silk flowers and go back to my fall wreath from last year?


    Or will this work?


    Addition: I just reworked it some...made it taller and less wide. Ann...a reader of BNOTP, just emailed and said a trick is to use chicken wire down inside the basket...I like that idea!

    Oh, I should have mentioned...I'm going to try to make pumpkin topiaries this next week. Wish me luck. Anyone know how to get those babies to all stand up interconnected? I want them to last at least until Halloween so I'm kind of reluctant to go poking holes in them...to attach them with wire or dowels. I'd love to pull out the existing topiaries (temporarily) and reuse the urns I already have...but I can't remove the topiaries from the pots...see THIS disaster post :( and you'll know why. So, I'll need to buy new urns/pots for my pumpkin topiaries. Home Depot or Lowes...here I come.


    This post has been linked to Sarah, Outdoor Spaces Party at Thrifty Decor Chick.  Thanks, Sarah!


    Metamorphosis Monday:
    If you are participating in Metamorphosis Monday: Please be sure to add your permalink below, and not your general blog address. To get your permalink, click on your post name, then just copy and paste the address that shows up in the address bar at the top, into the "url" box for the picture linky. You'll also need to put your e-mail address in, but don't worry, it will not be visible to anyone.

    I'd love it if you would include the MM button in your post, to make it easy for others to find you MM post. To do that, just copy and paste the Met Monday button to your computer or grab the html code from underneath the MM logo on my sidebar.

    Please include a link in your MM post back to the host blog, Between Naps on the Porch. Why is this important? When you include a link back to BNOTP, it ensures your regular readers/visitors will find the other awesome "Before and Afters" linked for this Metamorphosis Monday. If everyone links back, this maximizes the visits for all participants.

    Please do not add your link below, until your MM post is actually published to your blog. Please DO NOT type in all caps...it spreads the links waaaay out. Thanks! :-)

    Let's try something fun today! Please visit the person who linked before you and after you...that way everyone will get some visits. Hope you'll visit more, of course. :-)


Blog Archive

Total Pageviews